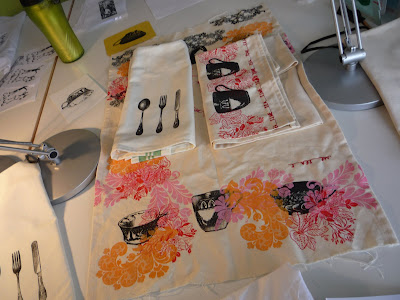
 Taught Gocco Printed Tea Towels today at the^workshop. Everyone did such a great job, and made so many beautiful things. People mostly printed on vintage and thrift store finds, so results for each fabric was different. I've posted a pretty comprehensive instruction sheet below for how to instructions on Gocco printing. You can also check out pics on flickr and more info on the save gocco website.


Gocco Printing Process
- Make sure you have batteries in your machine and fresh bulbs in the lightbox.
- To install bulbs simply place bulbs (2) into opening and lock into place by twisting clockwise. Set aside lightbox until you are ready to expose your image.
- Take your original carbon drawing or laser photocopy and place face up on the sticky gray pad. You can close the lid of the machine and look through the window to see if your image is centered.
- Once image is in place, place a fresh (unexposed) screen into the slots, arrow facing down. If you are using a photocopy, place the blue filter over the screen (between the screen and the lightbox, not the screen and the photocopy).
- Click your lightbox into place, without pressing down on the lid.
- Once lightbox is in place, press firmly down on the lid to expose the screen
- I close my eyes as there is a bright flash when this happens.
- Remove lightbox and throw away bulbs. You might want to wash your hands too.
- Remove photocopy, screen and filter.
- Apply ink to freshly exposed screen.
- Ink should go on thick and last for several dozen impressions.You can reapply ink as needed. Do not press or poke ink tube into the screen while applying ink. This will tear your screen.
- Place inked screen back into its holder, arrows facing down.
- Place paper, fabric etc onto the gray screento print (align as needed)
- Press down on the lid (like you did when exposing the bulbs). Now you’ve printed!
- Repeat impressions, and reapply ink as needed.
Clean up
- Use a paper towel to remove excess ink from screen (or squeegee off to save).
- Apply gocco cleaner to the screen like you did with the ink. Rub Gocco cleaner over surface of screen in circular motion with paper towel to remove excess ink and clean screen.
- Your screen will still look inked, but you should be able to see the image if held up to the light,
- Do not use solvents to clean your screen.
- You can also place screens in the fridge/freezer to use later without having to clean them. Just thaw before use.
- If your screen dries and wont print baby wipes seem to do the trick. Simply wipe down the prining side of the screen (not the inked side). You will have to print several throw away tests to remove ink swirls caused from wiping, but this seems to work best.
- Baby Wipes are great for removing any excess or misplace ink on your machine or screen. You want to keep your workspace nest and clean or you'll wind up with unwanted ink everywhere.
- If you notice any light spots in a print, re-ink your screen immediately. When you lift up the protective sheet to re-ink, you should be able to see exactly where ink needs to be reapplied. If you can see your image or pattern, you need ink in this spot.


2 comments:
Love the fork, knife and spoon one!
Thanks. I like how graphic it is. The colorful patterns are fun, but the silverware is so clean!
Post a Comment